
How to Use Copilot in Visual Studio: A Step-by-Step Guide
So, you’ve watched the tutorials. You paid your $10/month for GitHub Copilot. But when you open Visual Studio (the “big” IDE, not VS Code), you immediately get stuck.
You are likely wondering: how to use Copilot in Visual Studio correctly? ‘Where is the chat window? Why doesn’t it look like the VS Code tutorials?’
Don’t worry, you aren’t confused. Copilot actually works differently in Visual Studio compared to VS Code. Most guides mix them up, but this guide is 100% focused on Visual Studio.
We will walk you through the exact setup, from installation to writing your first AI-powered code, ensuring you master this tool in minutes.
Before You Start: The 3-Point Readiness Checklist
Before we dive into how to use Copilot in Visual Studio, let’s ensure your setup is bulletproof. Skipping this step is why 90% of beginners face errors.
Ensure you have these three things ready:
1. Update Your Visual Studio Version (Crucial)
This is the #1 mistake developers make. You strictly need Visual Studio 2022 (Version 17.8 or later) to access the new integrated chat features. Older versions will not work.
- How to Check: Go to the top menu: Help > About Microsoft Visual Studio.
- The Fix: If your version is old, open the Visual Studio Installer and click “Update” immediately.
2. Active GitHub Copilot Subscription
Copilot is a premium tool, not a free plugin. You must have an active subscription (or a verified Student account) linked to your GitHub profile.
- Resource: Check your status on the GitHub Copilot Official Page. (Tip: If you haven’t bought it yet, start with the free trial first).
3. Install the Correct “Workloads”
Copilot needs context to work its magic. It looks at your installed “Workloads” to understand if you are coding in C#, Python, or C++.
- How to Fix: Open Visual Studio Installer > Modify.
- What to Check: Ensure you have the workload for your specific language installed:
- .NET Desktop Development (for C#)
- Desktop Development with C++
- Python Development
- Node.js Development
Step 1: How to Install Copilot in Visual Studio (The “Right” Way)
This is the second-biggest point of confusion for developers.
- In VS Code, Copilot is just an “Extension.”
- In Visual Studio, it is a core “Component” inside the main installer. (Select “Visual Studio” or “Component”).
If you try to find it in the usual “Manage Extensions” window, you might get stuck. Here is the correct, crash-proof way to install it:
The Installation Workflow:
- Close Visual Studio completely. (Important: The installer won’t run if the IDE is open).
- Open the Visual Studio Installer app (Search for it in your Windows Start menu).
- Find your installed version (e.g., Visual Studio 2022) and click the “Modify” button.
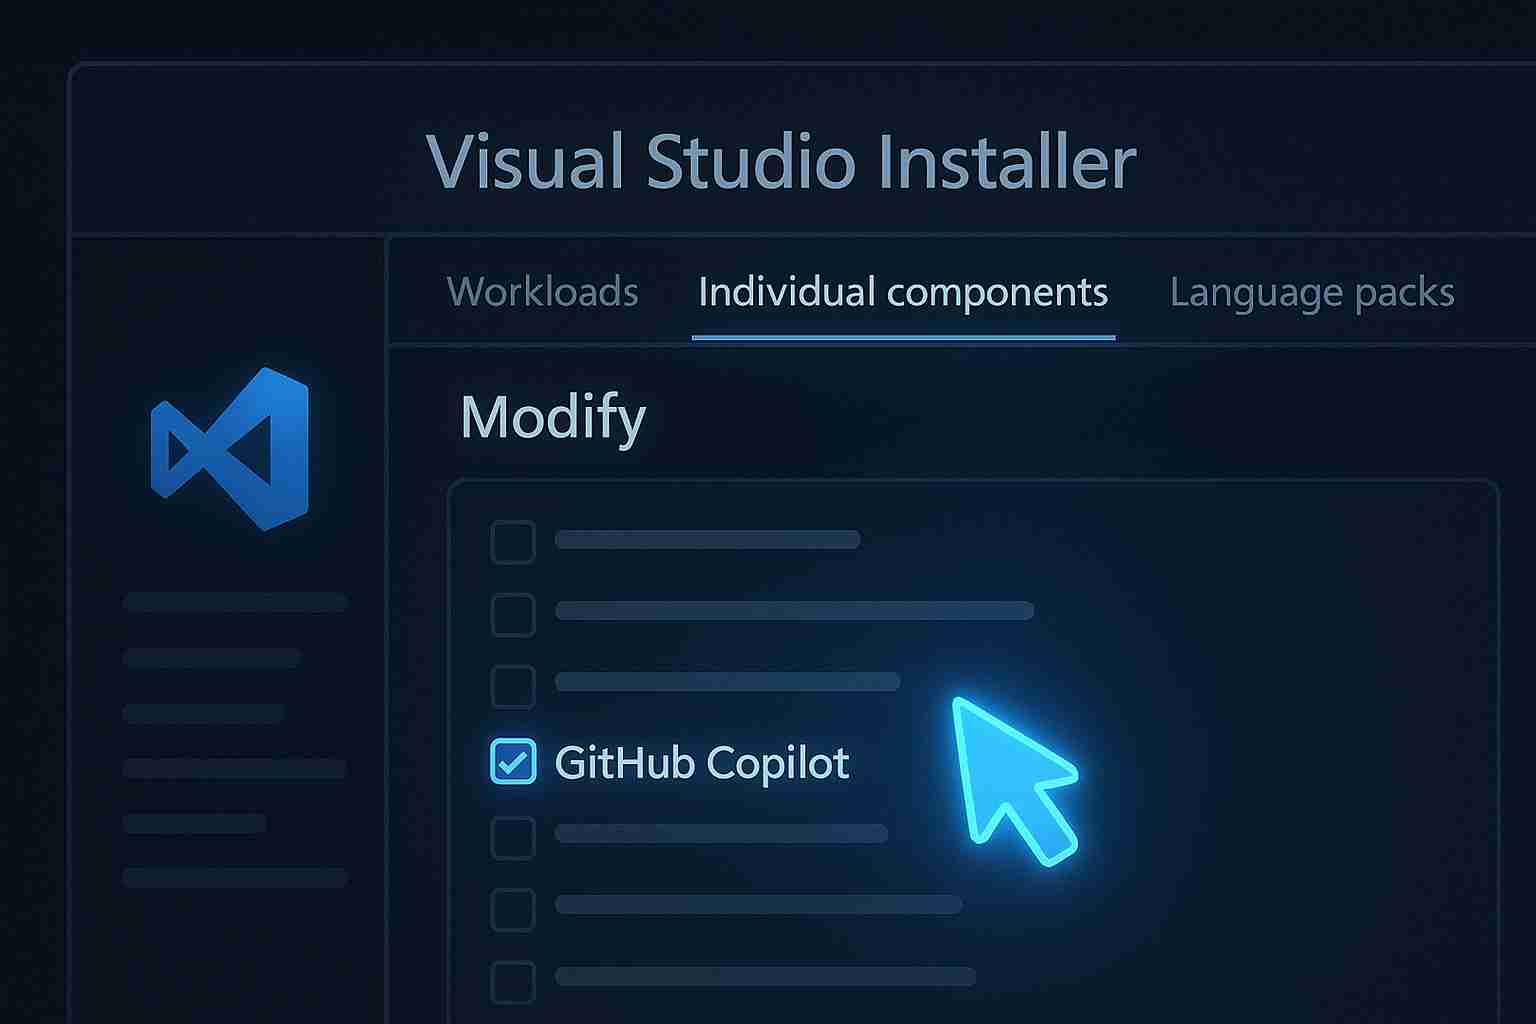
- In the new window, click the “Individual components” tab at the top.
- In the search bar, type: copilot.
- You will see GitHub Copilot. Check the box next to it.
- Click the “Modify” button in the bottom-right corner to start the download.
Pro Tip: It typically takes 2–5 minutes to install. Once it says “Installation Complete,” you are ready to launch.
Step 2: Using Copilot in Visual Studio for the First Time
Now that installation is complete, let’s turn it on. This is the foundation of how to use Copilot in Visual Studio correctly.
How to Activate It:
- Open Visual Studio.
- Look in the top-right corner, near your Profile/Account icon. You should now see a small GitHub Copilot icon.
- Click it and select “Sign in to GitHub”. Follow the browser prompts to link your active subscription.
The “Magic” Moment: Inline Suggestions
You’re logged in. Now what? Let’s see the AI in action immediately.
1. Open a Code File: Create a new C# or Python file (or open an existing one).
2. Type a Simple Comment: Find an empty line and type a comment in plain English describing what you want.
C#
// function to add two numbers
3. Wait One Second: Copilot will analyze your intent and show a “Ghost Text” (greyed out) suggestion of the entire function.
C#
// function to add two numbers
public int Add(int a, int b)
{
    return a + b;
}
4. Press [TAB]: To accept the suggestion, simply press the TAB key on your keyboard.
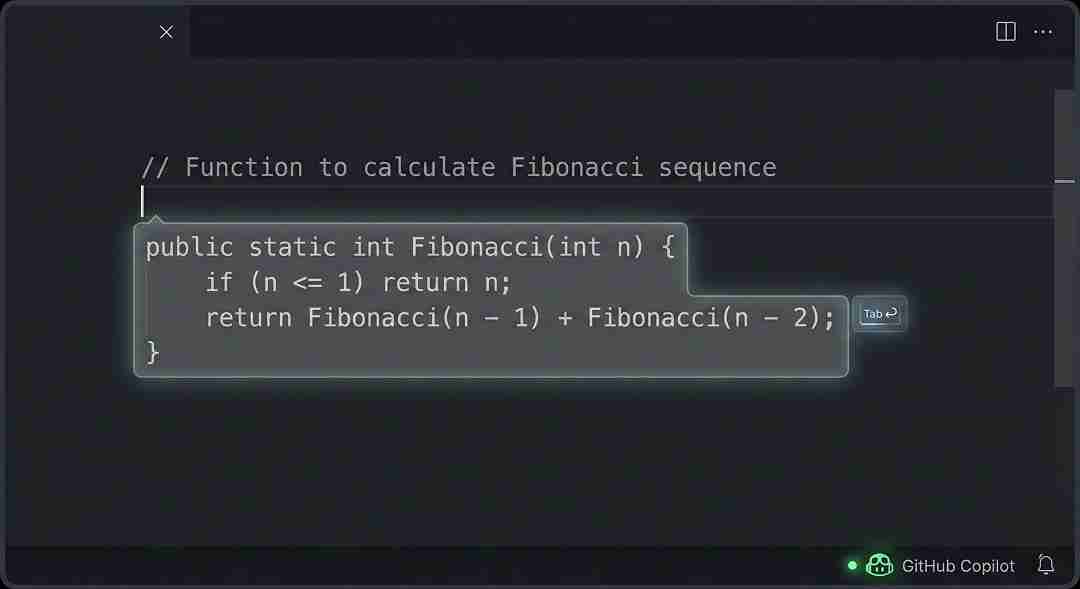
Congratulations! You are officially using Copilot. This feature is called “Inline Suggestions” and it will speed up your daily coding by predicting your next move.
Step 3: How to Use Copilot Chat (Your AI Partner)
Inline suggestions are great for speed, but Copilot Chat is where the real intelligence lives. Think of it as having a Senior Developer sitting next to you who understands your entire project context.
How to Open the Chat Window
- Menu: Go to View > GitHub Copilot Chat.
- Shortcut: Press Ctrl + Alt + I (or search “Copilot Chat” in the search bar).
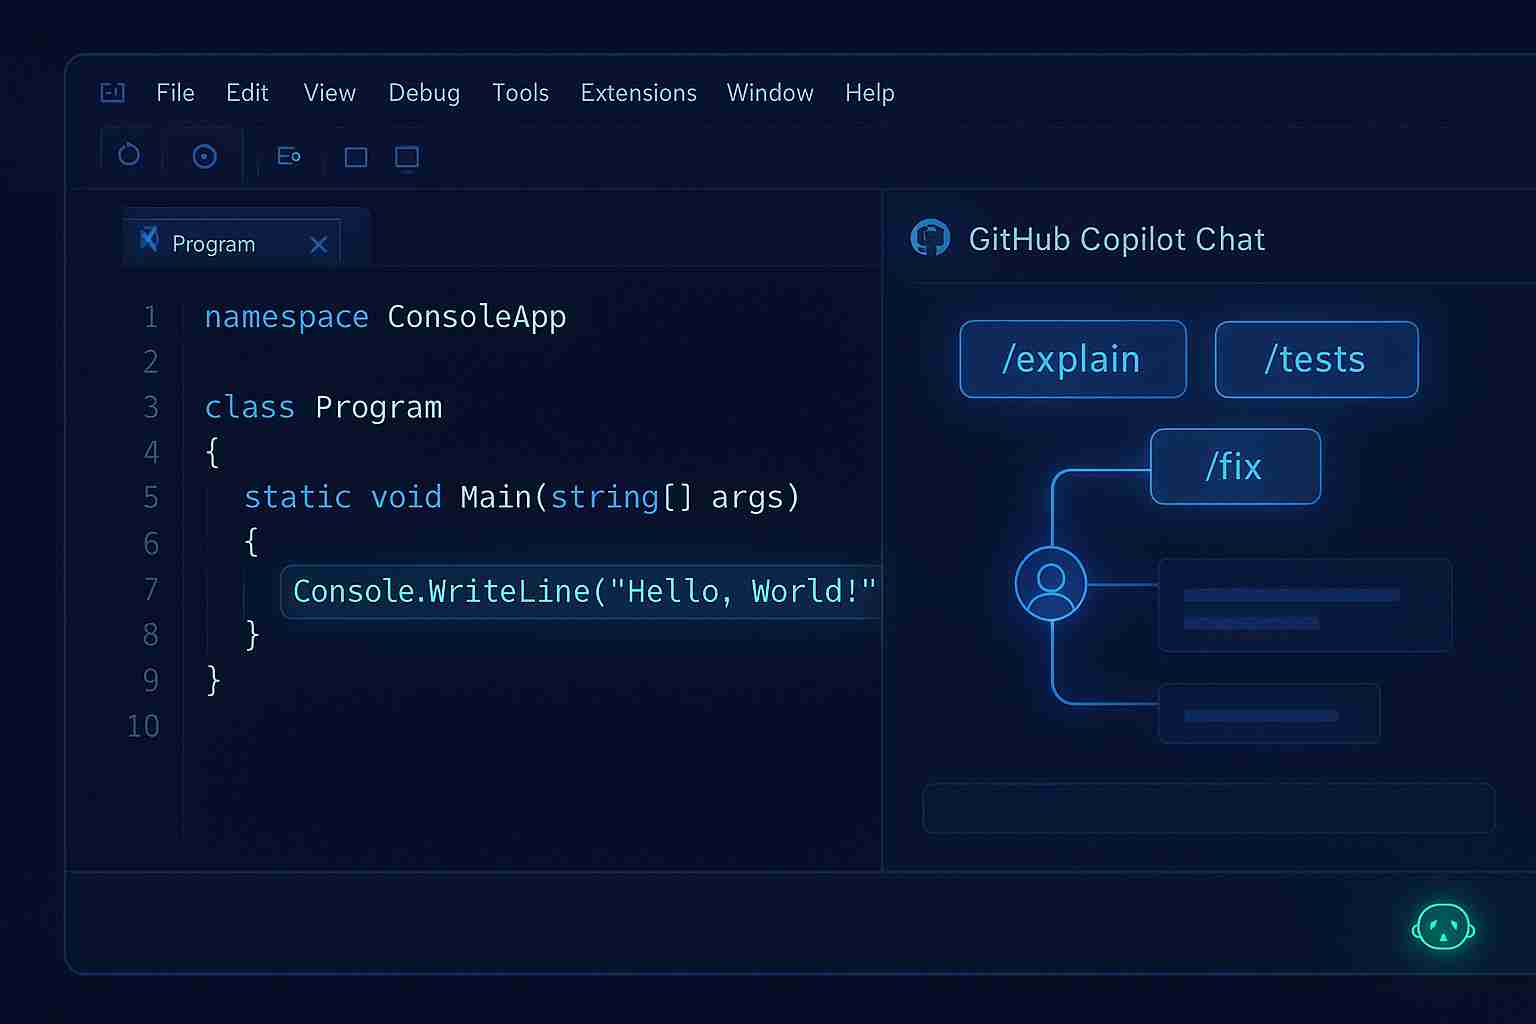
A new window will open (usually on the right), acting just like ChatGPT. Here are the 3 “Magic Prompts” you need to master immediately.
Magic Prompt 1: The “Explainer” (/explain)
The Scenario: You open a legacy project and find a complex, messy function you don’t understand.
- Highlight the code block in your editor.
- In the Chat window, type:
/explain- The Result: Copilot reads the highlighted code and gives you a plain-English, line-by-line breakdown of exactly what it does.
Magic Prompt 2: The “Test Generator” (/tests)
The Scenario: You wrote a function, but writing unit tests feels boring and repetitive.
- Highlight your function.
- In the Chat window, type:
/tests- The Result: Copilot analyzes your logic and writes a complete, professional unit test suite (using NUnit, xUnit, or your project’s default framework).
Magic Prompt 3: The “Bug Fixer” (/fix)
The Scenario: You see a red “squiggle” (error line), or your code crashes, and you can’t figure out why.
- Highlight the broken code.
- In the Chat window, type:
/fix- The Result: Copilot analyzes the error, suggests a solution, and explains why it broke so you learn from the mistake.
Build Something Real: These prompts work incredibly well with Python. Want to see them in action? Check our guide on How to Create AI-Powered Web Forms Using Python.)
Step 4: How to Use Inline Chat in Visual Studio (Power User Move)
This is the most underrated feature in Visual Studio. Why? Because every time you switch your eyes from the code editor to the side chat window, you lose focus. Inline Chat fixes this by bringing the AI directly onto your cursor.
Here is the “Flow State” Workflow:
- Select Your Target: Highlight the specific function or code block you want to modify.
- Trigger the Ghost: Press Alt + / (or right-click and select “Ask Copilot”). A small, floating chat bar will appear right on top of your code.
- Command It: Type a direct request.
- Example 1: “Add error handling (try/catch) to this block.”
- Example 2: “Refactor this synchronous method to be async.”
- Review the Diff: This is the best part. Copilot won’t just overwrite your code. It shows a Difference View (Red for delete, Green for add). You can clearly see exactly what it wants to change.
- Accept: If it looks good, click “Accept” (or press Enter).
Bonus: Monetizing Your Copilot Skills (The Financial Roadmap)
You have learned how to use Copilot in Visual Studio. You are now officially an “AI-Powered Developer.”
Why does this matter financially? Clients don’t pay for “hours”; they pay for results. By using Copilot, you can code 50% faster. This means you can complete two freelance projects in the time it used to take to finish one. Double the speed = Double the income potential.
Your 2-Step Roadmap to Monetize AI Coding
Step 1: Build Proof (The Portfolio) You need to show clients that you can solve real business problems, not just write “Hello World.”
Build This: Check our guide on 5 Python AI Projects for Your Portfolio (That Actually Impress Clients).
Step 2: Sell the Skill (The Pitch) Once you have the skills, you need to find clients who value speed and AI efficiency.
Sell This: Learn exactly how to pitch your new speed to clients in our guide: How to Get High-Paying AI Clients on Upwork.
FAQs: Common Questions About Copilot in Visual Studio
Q1: Is Copilot free for Visual Studio?
No, it is a paid tool. It requires a subscription of $10/month (Individual) or $19/month (Business). However, it is 100% free for verified students and maintainers of popular open-source projects.
Q2: Does it work well with C# and .NET?
Yes! It is optimized specifically for C#. Since Microsoft owns both GitHub and the .NET ecosystem, Visual Studio users often get better, more context-aware suggestions for C# than users of other languages.
Q3: What’s the difference between “Inline Copilot” and “Copilot Chat”?
Think of them as “The Hand” vs “The Brain.”
- Inline Copilot: Acts as an advanced auto-complete. It suggests code as you type (You press TAB to accept).
- Copilot Chat: Acts as a conversation partner. You ask it questions like /explain or /fix to solve problems.
Q4: My “inline suggestions” (TAB) are not working! How do I fix it?
This is a common configuration error. First, ensure the Copilot icon in the bottom status bar is active. If it is, go to Tools > Options > IntelliCode and ensure “AI-assisted IntelliSense” is enabled.
Conclusion: It’s a “Co-pilot,” Not an “Auto-pilot”
You are now 100% ready. You know exactly how to use Copilot in Visual Studio to speed up your coding workflow.
Let’s recap your new roadmap:
- Install the component correctly via the Visual Studio Installer.
- Speed Up typing with Inline Suggestions (TAB).
- Solve Problems with Chat Commands (/explain, /fix).
- Refactor instantly using Inline Chat (Alt + /).
The Golden Rule
The most important advice I can give you is this: Copilot is not perfect. It will make mistakes. Always review and test the code it generates.
Remember, it is your “Co-pilot” designed to help you fly faster, not an “Auto-pilot” that flies the plane for you while you sleep.
Your Journey Starts Now
Don’t just read this guide, go write some code!
Which Copilot feature will you try first: /explain or /fix?
Let me know in the comments below!
Want more developer roadmaps? Explore our full library of AI-Powered Learning Guides on HALearnix to turn your coding skills into a career.
About the Author
Name: Hafiza Amna (HA)
Role: Founder & Senior SEO Strategist @ HALearnix
Bio:
HA is the Founder and Lead Content Strategist at halearnix.com/. With a specialized background in Academic Writing, Search Engine Optimization (SEO), AI Tools, and Prompt-Engineering, Transforming complex topics into engaging, human-written content for maximum user understanding.
Passionate about “AI-Powered Learning,” HA is dedicated to helping students and freelancers build sustainable digital assets with AI through expert-backed, 100% solution-based guides.
Connect with me: 🔗 LinkedIn Profile