

How to Create AI Powered Web Forms Using Python
Let’s be honest: your website’s “Contact Us” form is probably a black hole. Most websites still use static forms that collect data, send a plain email, and then… nothing. Today, that “dumb” form is a costly liability. Spam floods your inbox, serious leads get buried, and you lose revenue. The solution is to learn how to create AI powered web forms using Python—transforming that data-collecting black hole into an intelligent digital asset.
In this guide, we’ll show you how to build forms that can:
- Automatically filter 99% of spam.
- Score leads (Hot / Warm / Cold) instantly.
- Analyze sentiment to flag angry customers before they escalate.
By the end of this tutorial, you’ll have a working Python backend API (using Flask) that accepts form submissions from any frontend, sends them to an AI engine for structured analysis, and returns actionable JSON.
Prerequisites – Your “AI Form” Tech Stack
This tutorial is built on a powerful, modern “decoupled” strategy: your Python backend will be an intelligent “brain” that can plug into any frontend (WordPress, a static HTML site, React, etc.). This makes your solution flexible, secure, and scalable.
Here’s the tech you’ll need to build it.
1. Python & A Web Framework
You will need Python (3.8+ recommended). This is the language we’ll use for all our AI logic.
However, you can’t just run a .py file on its own. You must use a web framework to create an API endpoint. This is the “digital door” that your frontend form will knock on to submit its data.
- Our Choice: Flask We’ll use Flask because it’s the classic, lightweight, and incredibly simple choice for building a robust API in just a few lines of code. It’s perfect for this job.
- The Alternative: FastAPI If you’re more advanced or want higher performance, FastAPI is the modern, asynchronous (async) alternative. The logic in this guide can be easily adapted to it.
If your Python fundamentals feel rusty, or you’re not sure how it connects with web technologies, refresh your knowledge with our Full AI Development with Python and JavaScript Guide.
2. The “AI Brain” (Choose Your Weapon)
This is the “magic” part. You need an AI to analyze the form data. You have two main paths, each with a critical trade-off: Cost vs. Control.
Path A: The API-First Approach (Recommended)
This is the fastest, smartest, and most accurate method. We let a massive, pre-trained model do the hard work for us.
- Tool: OpenAI API (GPT-4o)
- Pros: Near-human accuracy right out of the box. Zero model training is required. You can be up and running in 10 minutes.
- Cons: Requires an internet connection for every form submission and has a small cost per API call (though it’s incredibly cheap, fractions of a cent).
Path B: The Local Model Approach (Advanced)
This is the “free” or “offline” alternative. You run a smaller, less powerful model on your own server.
- Tool: Scikit-learn
- Pros: 100% free to run (no API costs). Data never leaves your server, which is a huge plus for data privacy.
- Cons: It’s “dumb” by default. You must provide a labeled dataset (e.g., 1,000 example messages) to train it. It’s also far less accurate for understanding complex language.
We will focus on the OpenAI API in this guide as it’s the 100% solution for high-accuracy results right out of the box.
3. The Frontend Layer
This guide assumes you have a basic HTML form and a few lines of JavaScript. All you need is the fetch API to send (POST) your form data to your new Python endpoint.
Tech Stack Summary Table
| Layer | Tool | Purpose |
|---|---|---|
| Backend | Python + Flask | Our API server to receive form data. |
| AI Engine | OpenAI API | Spam detection, sentiment analysis, & lead scoring. |
| Frontend | HTML + JS (fetch) | The user interface that sends data to our API. |
| Hosting | Render / PythonAnywhere | To put our Python API on the internet. |
| Dev Tools | Postman / cURL | To test our API endpoints locally. |
Step 1 – Build the Python Backend (The “Server”)
First, let’s build the minimal Flask server. This server will have one job: listen for a POST request on a specific URL (our “endpoint”), grab the form data, and get it ready for the AI.
Install Dependencies
Open your terminal and create a new project folder. Install the libraries we need.
Python

pip install flask flask-cors openai python-dotenvflask: Our web server.flask-cors: Crucial! This will allow our frontend (on another domain) to talk to our backend API without browser security errors.openai: The official Python client library for OpenAI.python-dotenv: A best practice for securely managing our API key.
Create Your Flask Server
Create a file named app.py. This is our entire backend.
Python

# app.py
from flask import Flask, request, jsonify
from flask_cors import CORS
import os
from dotenv import load_dotenv

# We'll create this file in Step 2
from ai_analyzer import analyze_form_data

# --- 1. SETUP ---
load_dotenv() # Loads the .env file
app = Flask(__name__)

# This is the crucial line for security.
# It allows your frontend domain to talk to this API.
CORS(app, resources={r"/analyze-form": {"origins": "https://your-website.com"}})
# For local testing, you can use: CORS(app)

# --- 2. API ENDPOINT ---
@app.route("/analyze-form", methods=["POST"])
def handle_form():
    # Get the JSON data from the frontend's fetch request
    data = request.json
    message = data.get("message", "")

    if not message:
        return jsonify({"error": "No message provided"}), 400

    # This is where the magic happens (Step 2)
    # We send the raw message to our AI logic
    ai_result = analyze_form_data(message)

    # Return the AI's analysis to the frontend
    return jsonify({
        "status": "ok",
        "analysis": ai_result
    })

# --- 3. RUN THE SERVER ---
if __name__ == "__main__":
    # Use 0.0.0.0 to make it accessible on your network
    app.run(host="0.0.0.0", port=8000, debug=True)
Note: For production, set debug=False and use a real WSGI server like Gunicorn.
Step 2 – Add the AI Logic (The “Brain”)
Now we create the “magic” file, ai_analyzer.py. This file will contain our logic for calling the OpenAI API.
Example 1 – Spam Detection & Lead Scoring Using OpenAI
First, create a .env file in the same folder to store your secret key. Never share this file or write your key directly in the code.
.env file:
# This is your secret key. Keep it safe and never share it.
OPENAI_API_KEY=sk-xxxxxxxxxxxxxxxxxxxxxxxxxxxxxx
Now, create the ai_analyzer.py file:
Python

# ai_analyzer.py
import os
import openai
import json

# Initialize the OpenAI client
client = openai.OpenAI(api_key=os.getenv("OPENAI_API_KEY"))

def analyze_form_data(message: str) -> dict:
    """
    Analyzes a form message using OpenAI for spam, sentiment, and lead score.
    Returns a structured dictionary.
    """

    # This "Magic Prompt" is your most valuable asset.
    # It instructs the AI to return *only* structured JSON.
    prompt = f"""
    Analyze the following web form submission. Return a compact, minified JSON object
    with ONLY the following 4 keys:
    1. 'is_spam' (boolean: true or false).
    2. 'sentiment' (string: 'positive', 'neutral', or 'negative').
    3. 'lead_score' (string: 'Hot', 'Warm', or 'Cold'). A 'Hot' lead is asking for prices,
       a demo, or to start a project.
    4. 'summary' (string: a one-sentence summary of the user's request).

    Message to analyze:
    "{message}"

    JSON Response:
    """

    try:
        response = client.chat.completions.create(
            # Use gpt-4o-mini for a great balance of speed, low cost, and intelligence
            model="gpt-4o-mini",
            messages=[
                {"role": "system", "content": "You are a helpful assistant that returns JSON."},
                {"role": "user", "content": prompt}
            ],
            temperature=0.0, # Deterministic, no creativity
            max_tokens=250,
            response_format={"type": "json_object"} # Enforce JSON output
        )

        content = response.choices[0].message.content

        # Safely parse the JSON string from the AI
        return json.loads(content)

    except Exception as e:
        print(f"OpenAI API error: {e}")
        # Return a standard error dict if AI fails
        return {"error": "AI_ANALYSIS_FAILED", "raw": str(e)}
Example 2 – AI Lead Scoring with Scikit-learn (Advanced)
ou prefer an offline model, you can train a simple classifier. You’d first need a CSV file (leads.csv) with “message” and “label” columns (e.g., “Hot”, “Cold”).
Python

# train_model.py (Run this once to create your model file)
import pandas as pd
from sklearn.feature_extraction.text import TfidfVectorizer
from sklearn.linear_model import LogisticRegression
from sklearn.pipeline import make_pipeline
import joblib

# 1. Load your data
df = pd.read_csv("leads.csv")
X = df['message']
y = df['label'] # 'Hot' or 'Cold'

# 2. Create and train the model
model = make_pipeline(TfidfVectorizer(), LogisticRegression())
model.fit(X, y)

# 3. Save the trained model to a file
joblib.dump(model, "lead_model.pkl")
print("Model trained and saved as lead_model.pkl")
You would then load this lead_model.pkl file in your ai_analyzer.py to make predictions instead of calling the OpenAI API.
Step 3 – Connect the Frontend (The “User Interface”)
Your Python AI backend is ready! Now, let’s connect our simple HTML form to it.
HTML Form Example
Here is a basic form. The id tags are important for our JavaScript.
HTML

<h2>My Smart AI Form</h2>
<form id="ai-form">
  <div>
    <label for="name">Name</label>
    <input id="name" name="name" type="text" placeholder="Your Name" required />
  </div>
  <div>
    <label for="email">Email</label>
    <input id="email" name="email" type="email" placeholder="Email" required />
  </div>
  <div>
    <label for="message">Message</label>
    <textarea id="message" name="message" placeholder="Message" required></textarea>
  </div>
  <button type="submit" id="submit-btn">Send</button>
</form>

<h4>AI Analysis Results:</h4>
<pre id="ai-result"><code>...</code></pre>
5-Line JavaScript “Connector”
This is the “glue.” Add this script to your HTML page. It listens for the “submit” button, stops the page from refreshing, and sends the data to your Python API using fetch.
JavaScript
// Add this inside a <script> tag at the bottom of your HTML
const form = document.querySelector('#ai-form');
const resultEl = document.querySelector('#ai-result code');
const submitBtn = document.querySelector('#submit-btn');
form.addEventListener('submit', async (e) => {
e.preventDefault(); // Stop the page from reloading
const message = form.message.value;
submitBtn.disabled = true;
resultEl.textContent = 'Analyzing...';
// This is the URL of your deployed Python API
const API_URL = 'https://your-render-app-url.com/analyze-form';
// 1. Send the data to your Python backend
try {
const res = await fetch(API_URL, {
method: 'POST',
headers: {'Content-Type': 'application/json'},
body: JSON.stringify({ message: message }) // Only send the message
});
const data = await res.json();
// 2. Display the AI's JSON response
resultEl.textContent = JSON.stringify(data.analysis, null, 2);
} catch (error) {
resultEl.textContent = 'Error connecting to the AI server.';
}
submitBtn.disabled = false;
});
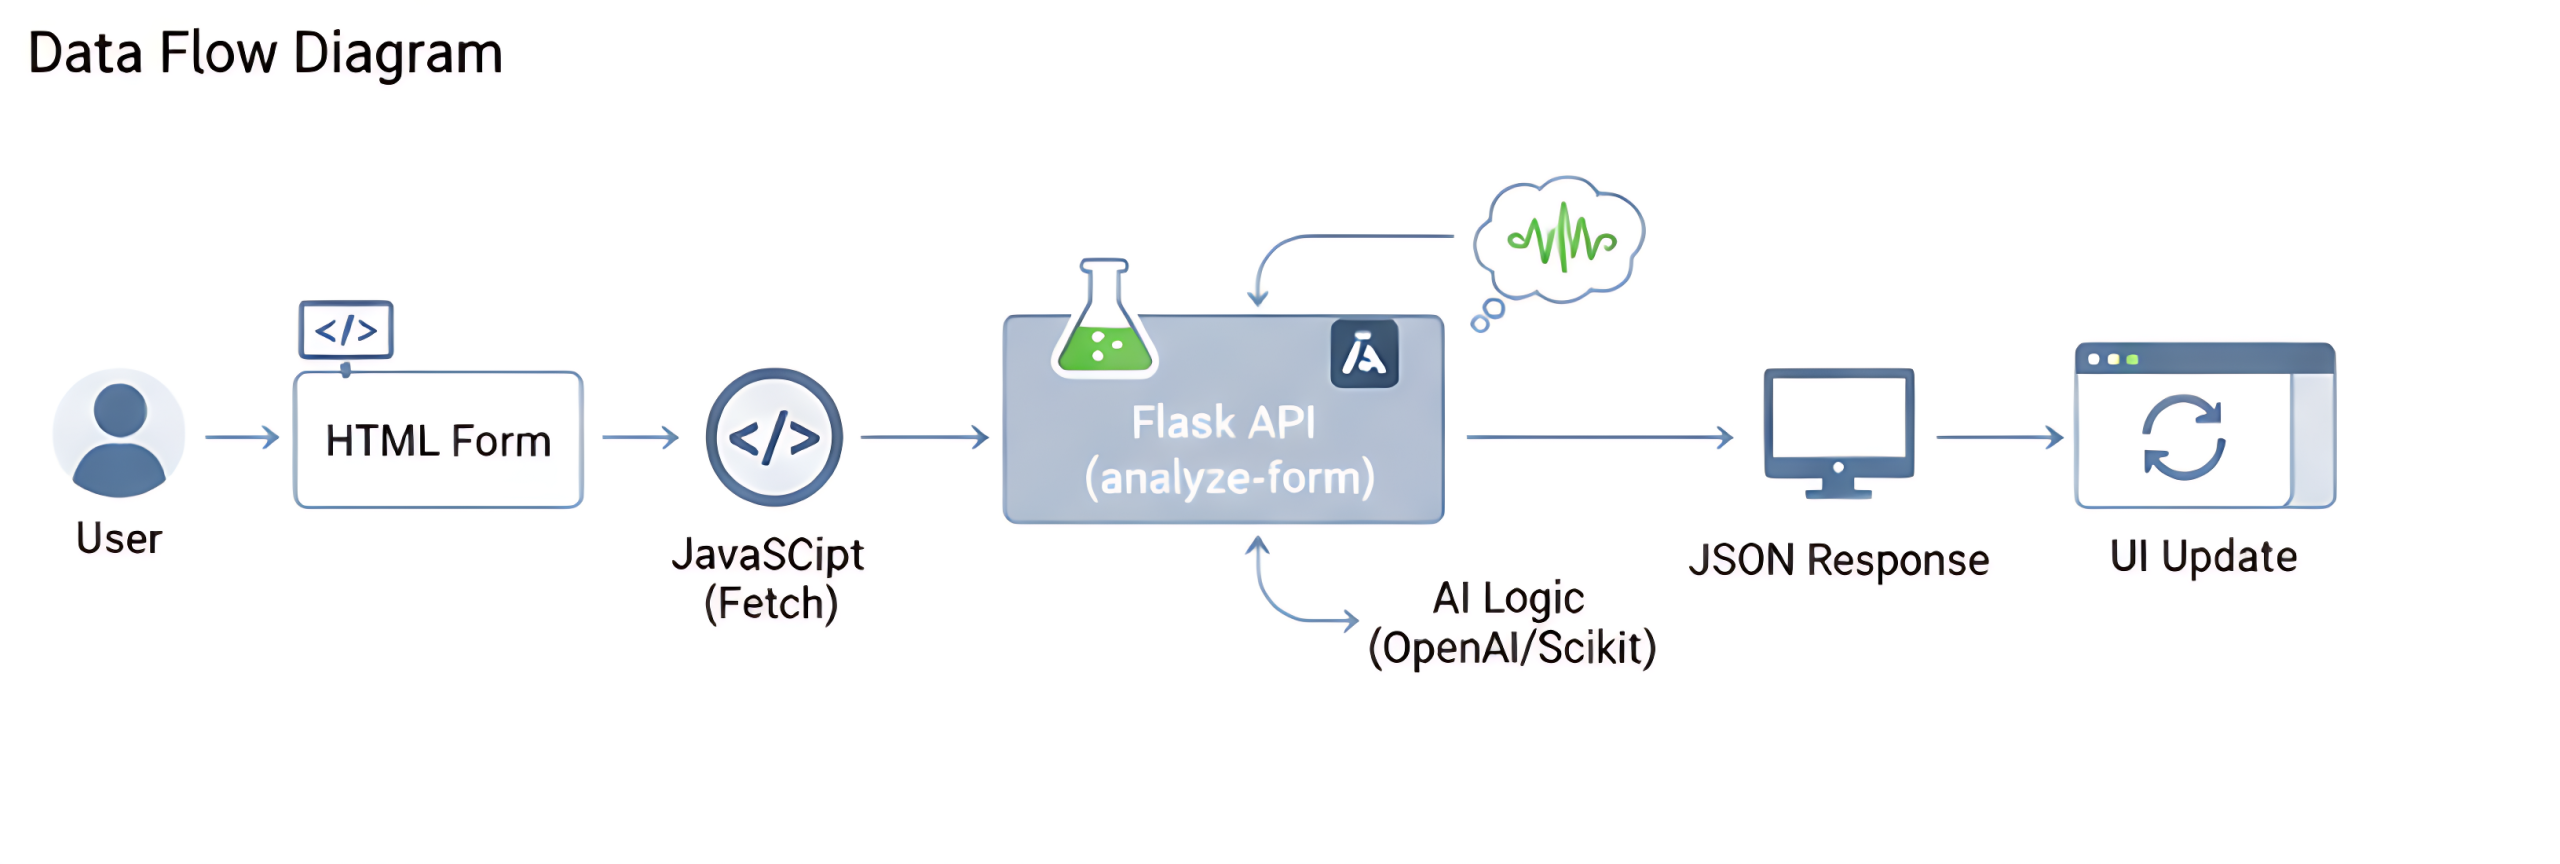
</script>Data Flow Diagram
Here’s the full journey of your data: User → HTML Form → JavaScript (fetch) → Flask API (/analyze-form) → AI Logic (OpenAI/Scikit) → JSON Response → UI Update
Step 4 – Deploy & Troubleshoot
Your app works on your localhost. To make it real, you must deploy the Python backend.
How to Deploy Your AI Web Form
Your HTML/JS can live anywhere (like Netlify or GitHub Pages). Your Python app.py needs a host:
- Render: The easiest, most modern choice for Flask apps. It has a free tier and connects directly to your GitHub repo.
- PythonAnywhere: Another excellent, beginner-friendly choice for hosting Python web apps.
Basic Deploy Steps (Render example):
- Push your code (app.py, ai_analyzer.py, requirements.txt) to a GitHub repo.
- Create a new “Web Service” on Render and connect it to your repo.
- Set the “Start Command” to
gunicorn app:app. - Go to the “Environment” tab and add your
OPENAI_API_KEY. - Deploy!
Common Errors (CORS, API Key, Rate Limits)
| Error | Cause | The Fix |
|---|---|---|
| CORS Error | Your browser is blocking your website from talking to your API (different domains). | Add flask-cors to your app.py and set the origins to your website’s domain (as shown in Step 1). |
| 401 / API Key | Your deployed app can’t find the OPENAI_API_KEY. | You must set the “Environment Variable” in your hosting platform’s (e.g., Render’s) dashboard. |
| Rate Limit | You are sending too many requests to the OpenAI free tier. | Add a credit card to your OpenAI account or build a queue system to slow down requests. |
Security Best Practices
- NEVER put your
OPENAI_API_KEYin your JavaScript or HTML code. It will be stolen. It must live on your Python server and be loaded as an environment variable. - Always use HTTPS for your API endpoint.
- Always set your
CORSorigins to only your domain in production.
💰 Bonus – Turn This AI Form Into a Client Project
You didn’t just build a tutorial project. You built a sellable digital asset.
Sell “AI Form Automation” on Upwork
You can now charge clients to upgrade their “dumb” forms.
Learn how to package this as a service and find clients: How to Get High-Paying AI Clients on Upwork.
Showcase This Project in Your Portfolio
This is a high-value project. Record a 1-minute video showing your form in action.
Learn how to build a brand around your new skills: How to Build a Personal Brand as a Freelancer in Pakistan.
FAQs – How to Create AI Powered Web Forms Using Python
Q1: Can I build this without writing frontend code?
Yes. You can use a no-code form builder like Tally or Typeform that supports “webhooks.” You can set the webhook URL to your Python API endpoint. The form will send its data to your AI, but it won’t be able to show the response back to the user.
Q2: Are OpenAI costs high?
No. Using a fast model like gpt-4o-mini is incredibly cheap. Analyzing thousands of form submissions will likely cost less than a cup of coffee. It’s much cheaper than the human time it takes to read all that spam.
Q3: Is FastAPI better than Flask?
FastAPI is newer and much faster because it’s “asynchronous” (async). For a high-traffic site, it’s a better choice. For a small-to-medium project, Flask is simpler and perfectly fine.
Q4: How accurate will the spam detection be?
With a good “magic prompt” (like the one we wrote), modern AI models are extremely accurate at language tasks. It will be far more accurate than any simple keyword filter.
Q5: Can I store the results in a database?
Absolutely! A great “next step” is to modify your app.py to save both the message and the ai_result to a Firebase or Supabase database. This allows you to build a dashboard for your client to review their “Hot” leads.
Conclusion – Your Form Is Now an “Asset”
You’ve done it. You’ve successfully converted a simple contact form from a “dumb” data pipe into an AI-powered digital asset.
It saves time, prevents spam, surfaces valuable leads, and becomes a sellable service. You now know how to create AI powered web forms using Python—from the server to the AI logic to the frontend integration. This is a critical piece of your AI-powered financial roadmap.
Continue Learning & Related Resources
This project is the perfect bridge between “learning” and “earning.” Here’s where to go next:
- To Master the Skills: Dive deeper into the two languages that power this project with our Full AI Development with Python & JavaScript Guide.
- To Build Your Next Asset: Use this API knowledge to build a conversational tool with our guide on How to Build an AI Chatbot for Local Business.
Explore even more practical AI projects and tutorials on the HALearnix Blog Page.